

I’ll show a simple, reliable process that lets the oven do the heavy lifting while I relax. This short guide explains my low and slow method at 275°F for tender, fall-off-the-bone results and when I brush on bbq sauce for a sticky finish.
I start with quick prep: remove the membrane, season the rack, and wrap each piece tightly on a lined sheet. Baking at that gentle temp for about 2.5–3.5 hours yields meat pullback from the bones and a fork-tender texture.
I explain why I choose baby back or back ribs at times, how I read doneness cues, and when I finish under the broiler or on the grill for caramelized edges. I also cover storage and reheating so leftovers serve people well.
Key Takeaways
- Low and slow at 275°F gives tender results in 2.5–3.5 hours.
- Remove the membrane for better texture and cleaner bone pullback.
- Wrap racks on a lined sheet to keep moisture locked in.
- Finish with bbq sauce under high heat for sticky, caramelized edges.
- Store cooked ribs up to 4 days refrigerated or freeze for 3 months.
Why I Bake Ribs Low and Slow for Fall-Off-the-Bone Tenderness
I rely on patient heat and time to turn a tough rack into something tender and effortless.
Low slow cooking at about 275°F, wrapped tightly in foil, breaks down collagen over hours so the meat becomes fork-tender and yields clear pullback from the bone. I let standard racks rest in their sealed packets and avoid peeking; every minute opened releases steam and slows the tenderizing process.
I’ve tested hotter, faster methods, but this recipe brings out deeper flavor and steady texture across the back of the rack. Larger pieces may need up to four hours rather than minutes.
- Minimal hands-on time: 95% of the cooking time is inactive, so I prep sides while the oven works.
- Simple seasoning first: I let the pork shine, then finish with a sticky bbq glaze if I want caramelized edges.
- Doneness cues: look for meat pullback and an easy bone wiggle—those tell you it’s ready.
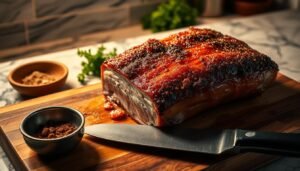
Choosing Your Cut: Spare Ribs vs Baby Back vs St. Louis-Style
Your choice of rack sets expectations for fat, meat, and how long it needs in steady heat.
Baby back ribs are shorter and leaner since they come from near the spine. I reach for these when I want a slightly quicker bake and a tender, milder pork profile.
Spare ribs are larger and meatier. Expect about 30–60 minutes more baking time because of extra fat and mass, which adds deeper flavor and a heartier bite.
St. Louis-style is simply a trimmed spare rack with a neat rectangular shape. I prefer it when even slices and tidy presentation matter—especially for guests.
- I remove the membrane on the back with a small knife so the rack becomes more tender and the bones pull cleanly.
- I season simply with salt and pepper or use a house rub that includes paprika and garlic powder for balanced flavor.
- No matter the cut, I keep the oven steady at 275°F and judge doneness by meat pullback and an easy bone wiggle.
I pick the cut based on who I’m serving and the taste I want—each rack responds beautifully when given low, patient heat and a finishing brush of bbq.
What You’ll Need: Tools, Pan Setup, and Simple Pantry Staples
Before the heat hits, I gather a few simple tools and pantry staples that make prep fast and foolproof. A roomy baking sheet and heavy-duty foil are my foundation. I like a pan that can hold a full rack without crowding.
Equipment I use
- A large baking sheet lined with heavy-duty foil for easy cleanup and a tight seal.
- An optional wire rack if I want slight elevation, and a sharp knife for membrane removal.
- Extra sheets when I cook multiple racks; each gets its own foil packet.
Pantry lineup and rub
I keep this simple: salt, pepper, paprika, brown sugar, onion and garlic powder, plus a pinch of chili powder. I mix the rub by cup or spoon if scaling and store leftovers in an airtight jar.
Small prep, steady oven heat, and the right foil seal save time and lock in great flavor for pork and back ribs.
Quick Prep: Remove the Membrane and Get the Racks Ready
A neat prep routine saves time and improves texture along the bones. I work on each rack quickly so the rest of this recipe moves smoothly.
Peel the silverskin with a small knife and a paper towel
I place the ribs meat-side down and slide a small knife under the thin membrane at one end. I lift just enough to get a grip with a paper towel, then pull in one steady motion. If it tears, I work in short sections until the back is clean.
- I check whether the butcher already removed it—if so, I save precious time.
- I pat the meat dry so the powder-based rub clings and browns inside the wrap.
- I trim stray flaps, fit the rack to my pan, and glance at the bones to note how far they protrude for later pullback cues.
This step is small but makes a big difference. For baby back and other ribs, it prevents a tough bite along the bone side and helps the final slices look tidy. I like that simple prep before baking keeps the recipe repeatable and reliable.
How to cook spare ribs in the oven: my foolproof low-and-slow method
I rely on steady, gentle heat and a tight seal of foil to coax tender meat from a full rack. This low-and-slow routine keeps moisture locked in and makes the process nearly hands-off.
Season both sides generously with a balanced rub of paprika, brown sugar, salt, pepper, onion and garlic powder. I press the rub so it adheres, then place the rack on a baking sheet and wrap it tightly with foil.
Season, wrap, and bake undisturbed
I bake ribs at 275°F for about 2.5–3.5 hours; larger racks may need up to 4 hours. Keep the wrapped foil sealed and avoid opening the packet—steam is your ally for melting connective tissue and tenderizing meat.
Glaze and finish until caramelized
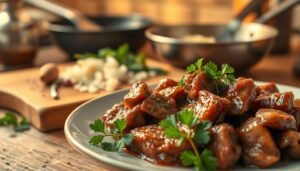
When the rack is fork-tender and the bones show pullback, I open the foil carefully and drain excess juices if needed. I brush both sides with your favorite bbq sauce and return the rack to high heat under a broiler or on a grill for a few minutes until the sauce bubbles and turns sticky.
- Doneness cues: visible meat pullback and an easy bone wiggle.
- Final touch: a thin second coat of sauce or a light sprinkle of rub after glazing if I want more depth.
- Rest: I let the rack sit a few minutes before slicing so juices settle for clean cuts.
Oven Temperature and Time Guide for Perfectly Tender Ribs
I pick a steady temp, then track minutes and hours so each rack finishes right. My baseline is 275°F for even, patient heat that melts collagen without drying the meat.

Timing notes: small racks often need about 2–2.5 hours, medium near 3 hours, and large racks may take up to 4 hours. I check the first time at roughly 2 hours, then every 20–30 minutes.
I wrap each rack tightly and fit two wrapped racks on one baking sheet when I cook for a crowd. That arrangement keeps the total time nearly unchanged.
Doneness cues
- Meat pullback from the bones is a visual sign.
- Fork-tender texture means the pork yields easily.
- A gentle bone wiggle shows collagen has broken down.
I let racks rest after removing from heat so juices settle. I write down the minutes and hours that worked in my oven for repeatable, delicious results.
Dry Rubs and Simple Seasoning Options I Love
I build flavor in layers so each bite has depth before any sauce appears.
Classic sweet-heat rub: I center this mix on paprika and brown sugar for color and balanced sweetness. Then I add salt and pepper for backbone and a dash of chili powder for gentle heat.
I round the rub with onion and garlic powders plus a little mustard powder for depth. When I have time, I pat the rub on, wrap the rack, and let it rest in the fridge for a couple of hours or overnight so the spices hydrate and penetrate.
Salt-and-pepper only
Sometimes I keep it ultra-simple: coarse salt and cracked pepper. This lets the pork, especially baby back, take center stage without distraction.
- Prep tip: apply rub generously and refrigerate if you can—time deepens flavor.
- Make-ahead: I keep a jar of the blend for busy days so the recipe moves fast.
- Balance: I cut sugar when planning a very sweet sauce so the finish stays harmonious.
- Use: same seasoning approach works for both baby back and larger racks; only the time changes.
BBQ Sauce Choices and Finishing: Broil vs Grill
I pick a sauce profile early so the finish amplifies the rub and meaty notes. Choose sweet, smoky, or spicy based on the rub and the flavor I want to highlight. Store-bought or homemade both work; I reach for clean-label jars when time is tight and a quick homemade batch when I want control.
Store-bought or homemade—sweet, smoky, or spicy
Balance matters. If the rub is sugary or heavy on paprika and brown sugar, I pick a tangy or smoky sauce to avoid clashing. For a simple salt-and-pepper rack, a sweet glaze shines.
Broiler finish in minutes for bubbly, sticky edges
After baking I discard excess juices, brush a thin layer of bbq sauce, and broil for about 3–5 minutes until it bubbles and sets. I repeat with a second coat if I want more gloss.
Grill finish for a kiss of char
Alternatively, I finish over direct heat on the grill for 3–4 minutes. I move the rack carefully and watch sugar content closely so the sauce caramelizes without burning.
- I decide on sweet, smoky, or spicy based on the rub and desired flavor.
- I brush a thin first layer, broil until bubbly, then add a second coat for shine.
- I grill when I want char, keeping heat low and handling the rack gently.
- I thin very thick sauce with a splash from a cup for smoother brushing.
- I avoid over-saucing when slicing so pieces stay tidy and flavorful.
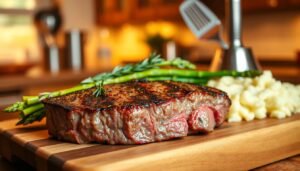
Serving Ideas: Sides That Make Ribs a Complete Meal

Bright, textured sides balance rich pork and sticky bbq sauce. I pair creamy potato salad or a tangy coleslaw when I want contrast. A big green salad with a zesty vinaigrette also lifts the plate.
Classic pairings I reach for
- Potato salad or macaroni salad for creamy comfort that soaks up extra sauce.
- Cornbread for a touch of sweet, crumbly goodness that complements back racks.
- Roasted or mashed potatoes when I want a heartier, comforting side for people who prefer a fuller plate.
- Fresh salads and crisp elements to cut through richness and keep each bite lively.
I plan portions based on how many people I serve so leftovers are welcome but not overwhelming. I also reuse favorite recipes for salads and make them ahead when I need free time at service.
Tip: keep extra sauce on the table so guests can add more without over-saucing during cooking. Color and contrast on the plate make each bite feel balanced and inviting.
Make-Ahead, Storing, Reheating, and Freezing Tips
Smart storage keeps a great meal tasting fresh and saves time later. I cool ribs completely, then pack them airtight and refrigerate up to four days. For longer storage I double-wrap and freeze for up to three months.
Fridge and freezer guidance: I wrap each rack separately so I reheat only what I need. Label packages with dates and place wrapped racks two per baking sheet when thawing or reheating for easy handling.
“Wrap well, label clearly, and reheat low and slow for best texture.”
Reheating and finishing
I reheat wrapped foil in the oven at 275°F for about 20–30 minutes until warmed through. For a bit of char, I warm on a medium grill and brush bbq at the end so sugars don’t burn.
- I set wrapped racks on a pan or sheet to catch drips.
- I save pan juices only if they smell fresh and use sparingly to moisten before saucing.
- I avoid microwaving; low, steady heat keeps ribs tender and true to the recipe.
Conclusion
A steady routine and simple tools turn a full rack into a memorable meal every time.
Low-and-slow heat, tight foil wrapping, and membrane removal are the core of this recipe. Trust time over a clock and finish under a broiler or on a grill for that sticky, slightly charred sheen.
I use the same method for baby back or back ribs; only minutes change. Plan bright sides for contrast and keep a favorite rub and sauce handy for fast prep.
Leftovers reheat best wrapped at 275°F on a baking sheet so pork stays moist. Thanks for cooking along — save these notes about sheet setup and slice thickness. With care and consistency, great results follow every round.