
I set expectations up front: I’m reheating a fully cooked centerpiece so it stays juicy and glossy for the holiday table. I stick with a simple plan: low-and-slow in the oven, cut-side down, then finish with a sticky glaze and a quick broil.
Timing matters: I aim for 10–15 minutes per pound at 325°F and check early with a reliable thermometer. If the internal temp hits 135°F, I pull the roast, let it rest, and tent with foil so it won’t overshoot 140°F.
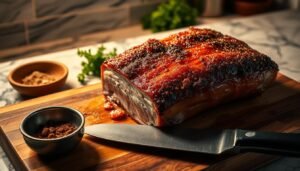
I place the ham cut-side down in a shallow roasting pan, tent it with foil for most of the reheating, and remove the cover for the last 20 minutes to brush on my brown sugar-pineapple glaze. Near the end, a brief broil gives that caramelized shine without drying the exterior.
I keep tools handy: roasting pan, heavy foil, and a probe thermometer. I spoon pan juices over slices before serving for extra flavor and shine.
Key Takeaways
- Most spiral hams are fully cooked; reheat to 140°F for best results.
- Plan 10–15 minutes per pound at 325°F and check early with a thermometer.
- Keep the roast cut-side down and tent with foil to retain moisture.
- Add glaze in the last 20 minutes and broil briefly for caramelization.
- Use pan juices and a quick rest to keep slices juicy and flavorful.
Why I Love Spiral Ham for the Holidays
That pre-sliced, smoked centerpiece is my secret for calm holiday hosting. A pre-smoked spiral cut is already cooked and sliced, which trims prep down to minutes and keeps service smooth.
Fully cooked convenience for stress-free hosting
I value predictability. Because the roast arrives pre-sliced and smoked, I focus on guests instead of the oven. Guests help themselves to neat portions, and I skip last-minute carving.
Classic flavors that pair with potatoes and more
The sweet-savory profile pairs beautifully with creamy mashed potatoes, bright green beans, and buttery biscuits. A touch of sugar in my glaze brings warm, nostalgic notes without overpowering the plate.
- Already cooked and pre-sliced means quick reheating and easy serving.
- Crowd-pleasing flavor that even picky eaters enjoy.
- Leftovers become simple recipes for sandwiches and breakfast scrambles.
- Predictability is my reliable way to deliver a big-impact main with minimal stress.
My Step-by-Step: How to Cook a Spiral Ham
I keep the method simple and reliable. First I set the oven to 325°F and clear the center rack so heat circulates evenly. I unwrap the roast, discard any bone disk, and nestle it cut-side down in a shallow roasting pan.
Preheat, prep, and set the roast
- Preheat the oven and make sure the center rack is empty for even cooking.
- Place ham cut-side down in the roasting pan so the pre-sliced layers stay moist.
- Tent snugly with foil to lock in steam during the initial bake.
Low-and-slow, then glaze and finish
- Plan about 10–15 minutes per pound and check temperature early so it won’t overcook.
- Mix a glaze with brown sugar, honey, and a splash of juice; remove the foil and brush in the final 20 minutes.
- Optionally broil for a minute for a lacquered surface—watch closely so the sugar doesn’t scorch.
Rest, slice, and spoon pan juices
After the oven, I rest the meat at least 15 minutes so juices redistribute. Then I slice along the spiral and spoon hot pan juices over the top for shine and extra flavor.
Time and Temperature: Minutes per Pound That Actually Work
I set my oven at 325°F and let timing steer the outcome. I aim for 12–15 minutes per pound when reheating; that window warms the center without drying the surface. Covered baking trends toward the shorter end, while an uncovered finish needs more minutes for a crisp exterior.
My practical timing rules
- I default to 325°F and plan 10–15 minutes per pound, leaning shorter when covered and longer when uncovered.
- I watch a meat thermometer and often pull at about 135°F because carryover brings the internal temperature to roughly 140°F.
- Insert the thermometer into the thickest portion, away from bone, for accurate readings.
- Shape matters: taller, round roasts take longer than flatter ones with more surface exposure.
- I never raise the oven higher to save minutes; higher heat risks a dry outer layer.

I keep a small cup for basting and save my brown sugar glaze for the last 20 minutes. I also build buffer minutes so the roast rests and finishes warm and juicy.
Brown Sugar Pineapple Glaze (Skip the Packet, Make It Shine)
For a lacquered finish I whisk a bright, simple glaze and save it for the final stage. This keeps the slices glossy without over-sweetening the meat.
My base: I stir about 2/3 cup brown sugar with 1/4 cup pineapple juice, a squeeze of honey and 2 tablespoons Dijon.
- I add warm spices — cinnamon, clove, allspice and a touch of paprika — for color and depth.
- I brush the glaze on during the last 20 minutes so sugars caramelize instead of burning.
- If I want extra shine I broil briefly, watching the surface so it blisters but does not char.
- I baste between slices so the flavor seeps into the pre-cut layers and the pan juices can be reduced with a bit more sugar and juice for serving.
Why I skip the packet: Homemade glaze tastes brighter and fresher. It pairs well with a spiral center and works in any oven. This simple recipe gives a sticky, balanced finish that guests notice.
Essential Gear: Roasting Pan, Foil, and a Meat Thermometer
My gear list is short but essential: a shallow roasting pan, heavy foil, and a reliable meat thermometer. These three items keep reheating simple and predictable.
I use a shallow roasting pan so air flows around the roast and drippings collect for basting. A pan with sturdy handles makes moving the roast safe and easy.
- I tent with foil early to lock in moisture, then remove it for glazing and color development.
- I rely on a meat thermometer to confirm the center reaches the right temperature without guessing.
- I position the rack in the middle of the oven and keep an extra sheet of foil ready for re-tenting.
- I keep a basting brush or ladle, oven mitts, and a carving board close at hand for the finish and rest.
These tools turn reheating into a calm task and help the spiral ham stay glossy and juicy for the table.
how to cook a spiral ham Without Drying It Out
I begin by protecting the surface so the center heats gently.
I tent the roast with foil early. This traps steam and shields the pre-sliced layers from direct oven air.
Cover early, uncover to glaze: managing moisture and crust
I keep the roast covered for most of the warm-up, then remove the cover only when I glaze and brown. Gentle heat prevents a tough crust while giving sugars time to caramelize.
Place ham cut-side down to keep slices juicy
I always place ham cut-side down. That simple step keeps slices moist and stops the exposed edges from drying out. I baste with pan juices if the surface looks dull during the final minutes.
Shape matters: round vs. flatter hams and cook time
Round roasts need more minutes than flatter ones at the same weight. I watch internal temperature with a meat thermometer and plan for carryover heat to reach final doneness.
- Protect moisture by tenting with foil, uncover late for glaze and color.
- Place ham cut ham-side down so slices stay juicy, not dry.
- Use a thermometer; aim for finish temperature, then rest before carving.
Alternate Methods: Slow Cooker and Oven Variations
When I need a hands-off option, the slow cooker is my go-to for warm, evenly moistened meat.
I add a splash of apple or pineapple juice and set the crock pot on low for about 4–5 hours since the roast arrives fully cooked. This long cook keeps slices tender without drying the layers.
In the oven, I follow the 10–15 minutes per pound rule at 325°F. Covered baking shortens the time and keeps moisture. I remove the cover near the end when I want deeper caramelization, which often requires extra minutes.
- I use the slow cooker on low with juice when I have several hours before dinner.
- Covered oven baking gives maximum moisture and steady timing.
- I uncover for the last minutes for a crisper, glazed exterior.
- I still check with a thermometer and aim for about 140°F final temp, probing away from the bone.
- I pour off crock pot or pan juices and simmer them into a quick glaze for more intensity.
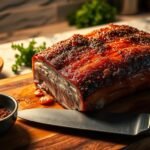
How I Slice and Serve Spiral Cut Ham
I keep plating simple so guests can dig in right away. I trace the pre-cut path and let neat portions fall away as I work around the bone.
Follow the path and carve around the bone
I locate the bone first and cut gently around it so the pre-cut layers release cleanly. I aim for thin, even slices so each bite mixes lean and marbled meat.
Classic sides and finishing touches
I plan about 6 ounces per person and always make extra for seconds. For a classic plate I add mashed potatoes, green beans, and warm biscuits.
- I arrange slices on a warm platter and spoon pan juices or extra glaze over the top for shine.
- I keep a small cup of warmed sauce on the side so guests may add more.
- I save the bone for soup stock and hold back a few thicker pieces for sandwiches the next day.
Leftovers, Reheating, and Using the Ham Bone
After the party, I treat the remaining meat as the start of several quick dinners. Leftovers store well when wrapped tight and chilled right away. I keep cooked portions in the fridge for 3–5 days and in the freezer up to 2 months for best quality.
I rewarm slices in the oven set between 275–325°F, covered with a splash of water in the pan. I plan about 10 minutes per pound and check temperature so the meat is hot but not dry. When ready, I remove ham from the oven and serve immediately.

- Wrap tightly: fridge 3–5 days, freezer up to 2 months.
- Reheat method: ham oven at 275–325°F, covered in a roasting pan or casserole with some liquid; roughly 10 minutes per pound.
- Finish quickly: remove ham from oven as soon as it’s warmed and avoid repeated reheats.
I reuse the bone for a hearty pot of soup or beans that stores well for several hours on the stove and longer in the fridge. I cube leftover slices for breakfast bakes, layer them for sandwiches and pizza, or dice small for fried rice. These simple recipes stretch meals and keep holiday flavor in easy weeknight dishes.
Conclusion
I keep the finish simple and reliable. My steady way—325°F, about 10–15 minutes per pound, covered early and glazed late—gives juicy, glossy results every time.
I trust a meat thermometer and pull the roast so carryover reaches roughly 140°F. I brush on a brown sugar glaze with honey and juice in the final 20 minutes for shine and flavor.
Leftovers store well for days or freeze up to two months. I set the bone aside for soup and scrape the pan drippings into a quick sauce so the last bite tastes as good as the first.