
I’ll walk you through my stove-to-oven method that builds a deep crust on the stovetop and finishes with an even, juicy center. I keep steps simple: high-heat sear, quick oven finish, and a short rest so juices stay put.
Quick facts: preheat the oven to 400–450°F, sear 2–3 minutes per side in a hot skillet, then transfer the pan for a brief oven finish based on thickness and target temperature. Aim for internal temps by doneness and allow ~5°F carryover rise.
My guide covers the right cut, thickness, and three fail-safe ingredients: salt, black pepper, and oil. I’ll also show thermometer technique (probe through the side), rest minutes, and an optional butter, garlic, and herb baste for pan juices.
Key Takeaways
- Sear first for crust, finish in a preheated oven for even doneness.
- Use an instant-read probe through the side for accurate temps.
- Plan a 5–10 minute rest to lock in juices and account for carryover.
- Choose an oven-safe pan, like cast iron, and avoid overcrowding.
- Simple ingredients and brief basting yield steakhouse flavor at home.
Why I Love This Stove-to-Oven Method for Sirloin
This routine gives me control and consistent results. A hot pan seals a rich crust in minutes, while a quick oven finish brings the center up without burning the outside. That balance is perfect for 1½–2-inch cuts like ribeye or New York strip as well as my favorite sirloin.
The pan finish adds one big advantage: pan juices. I baste or spoon those over leaner beef and get extra flavor without a complicated marinade. I keep seasoning simple: kosher salt, freshly ground black pepper, and a bit of olive oil or neutral oil.
I let meat rest at room temperature about 30 minutes before I heat the cast iron. That short pause helps heat travel more evenly and trims minutes in the oven. My final tip: use a thermometer and set an alert so you hit the exact doneness every time.
- Quick sear for crust
- Oven finish for even doneness
- Simple seasoning, tasty pan juices
Essential Gear: Skillet, Thermometer, and Oven Setup
Choose gear that gives you control and consistent results. My go-to is a 12-inch cast iron skillet heated until the oil just shimmers. A heavy pan holds steady heat for a deep crust and moves safely from stovetop to oven.
Cast iron skillet vs. other pans: heavy enameled cast iron works great, but any oven-safe frying pan will do if you preheat it thoroughly. Avoid crowding the pan; crowded pieces trap steam and ruin the sear.
Why a meat thermometer is non-negotiable
I use an instant-read thermometer and slip the probe through the side into the center. That gives a reliable internal reading so I can pull at the right temperature and allow a 5°F carryover during rest.
- Preheat oven to 400–450°F and heat the pan on medium-high until oil glints.
- If cooking multiple pieces, sear in batches so each gets direct contact.
- Keep an oven mitt handy—moving a hot iron skillet takes just a few quick, safe minutes.
Simple Ingredients That Deliver Big Flavor
I pick cuts that balance marbling and thickness so they hold up under a hard sear and a short oven finish. That choice makes seasoning and timing much easier.
What I look for in the cut
I choose sirloin at about 1½–2 inches thick with visible marbling. That fat keeps meat juicy and stands up to a hot pan and brief oven time.
Oil, salt, and black pepper: the core trio
I pat pieces very dry, rub a thin layer of olive oil, then season generously with kosher salt and freshly ground black pepper. This trio boosts beef flavor and helps form a brown crust.
Butter, garlic, and herbs: optional boosters
For richer finish I add 1–2 tablespoons butter with smashed garlic and thyme or rosemary, then baste in the hot pan. If I’m searing hotter, I swap in avocado or canola oil to cut smoke.
- I skip long marinades for classic results, but a quick balsamic or soy mix is optional.
- Season all pieces at once and give salt a few minutes to work before searing.
- Great ingredients plus solid technique beat complicated recipe tricks every time.
Pre-Cook Prep: From Fridge to Room Temperature
A calm prep routine saves trouble later. I bring my steaks out so they lose the chill and sit at room temperature for about 30 minutes. That short pause helps the center heat more evenly and trims time in the oven.
Pat dry and season properly. I blot the surface with paper towels until it feels dry. Then I season both sides with kosher salt and freshly ground black pepper. Dry meat plus season makes a better crust.
- I set the sirloin on the counter for about 30 minutes so it comes toward room temperature.
- I heat my skillet over medium-high for roughly 3 minutes, adding a thin film of oil just before the meat hits the pan.
- I avoid crowding—if I have multiple steaks, I cook in batches so the pan stays hot.
- I preheat oven to 400–450°F while the meat rests and keep a timer handy for each phase.
“Dry surfaces and a hot pan create the best browning, every time.”
Step-by-Step: Sear on the Stove, Finish in the Oven
My routine begins with a 425°F oven and a 12-inch iron skillet heated until the oil just shimmers. This setup gives a reliable crust and a quick, even finish for medium-thick cuts like sirloin.
Preheat and heat control: I set the oven to 425°F (400–450°F works) and warm the cast iron skillet over medium-high about three minutes. Watch the oil—when it glints, the pan is ready.
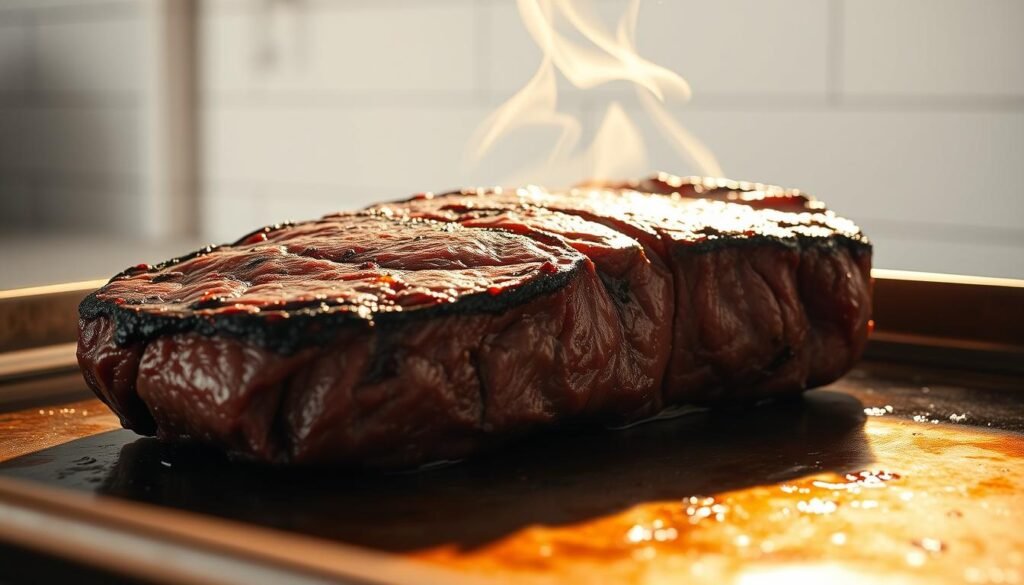
- Sear for a crust: Lay the steak in the hot skillet and don’t move it. Sear 2 to 3 minutes on the first side, then flip and sear 1 to 2 minutes more. That time builds a deep brown crust.
- Finish in the oven: Transfer the pan straight to the oven. Thin steaks often need 1–7 minutes; thicker cuts usually take 5–10 minutes. Use a thermometer inserted through the side for an accurate center reading.
- Resting and basting: Pull the steak a bit early to allow for carryover. I rest for 5 minutes (up to 10 if larger), spoon pan juices over slices, and sometimes add 1–2 tablespoons of butter, smashed garlic, and herbs for quick basting.
Follow these clear instructions and measured minutes, and you’ll hit target doneness with consistent, juicy results every time.
How to Cook Top Sirloin Steak in the Oven: Time & Temperature Guide
I match oven minutes to thickness so the center reaches the target temperature without overcooking the exterior.
Thickness matters: For a 1-inch cut, a quick sear may be enough or add about 0–4 minutes in the oven. For a 1½–2-inch cut, plan roughly 2–7 minutes after searing, depending on your target.

Target temps and carryover
Use an instant-read thermometer and watch these targets: rare 120–125°F, medium-rare 130–135°F, medium 135–145°F, medium-well 145–155°F, and well-done 160°F+.
Remember carryover: the internal temperature typically rises about 5°F while the beef rests. I pull the skillet a few degrees shy of my final goal.
- I check thinner cuts early—minutes add up fast and overcooking is easy.
- A hot skillet plus a preheated oven shortens overall time and preserves juiciness.
- I favor medium-rare to medium for balanced tenderness, but I follow the thermometer for exact doneness.
“Trust the thermometer; minutes are a guide, not a guarantee.”
Doneness, Juiciness, and Using a Meat Thermometer
Getting the final temperature right makes the difference between a dry slice and a juicy plate. I place the probe through the side so the tip sits squarely in the center for the most accurate read.
Quick technique notes:
- I insert my thermometer through the side so the probe tip reaches the center—one clean check avoids extra punctures.
- I pull the steak a few degrees before my target doneness. Carryover will raise the internal temperature during the rest minutes.
- I rest 5 minutes for thin cuts and up to 10 minutes for thicker pieces so juices redistribute before slicing.
- A dab of olive oil on the probe helps it slide in without tearing fibers, and a light sprinkle of salt after resting brightens the crust.
Typical target numbers I watch: rare ~125°F, medium-rare 130–135°F, medium 135–145°F, medium-well 145–155°F, well 160°F+. If I’m cooking multiple steaks in the oven, I check each one rather than guessing.
“Trust the probe, not the clock.”
Pro Tips, Common Mistakes, and My Favorite Flavor Tweaks
I keep a roaring pan and paper-dry meat; that combo is what builds an instant, restaurant-grade crust. A hot cast iron skillet and dry surface mean brown, not gray. That first contact matters more than any fancy sauce.
Simple choices save a botched cook. I preheat the iron until the oil just shimmers, pat the pieces dry, and season generously with kosher salt and freshly ground black pepper. Then I give each piece room so steam can’t sabotage the sear.
Quick practical tips
- I keep the pan ripping hot and watch the minutes closely; flip only when the crust releases.
- I add a pat of butter with smashed garlic and a sprig of rosemary near the end, then tilt and baste for glossy flavor.
- If smoke runs wild, I lower the heat or pick a higher smoke point oil for the next batch.
- After a five-minute rest, I slice against the grain so each bite feels tender and clean.
“Dry meat, hot iron, and timely butter make simple work of great results.”
Variations: No-Cast-Iron, Dry-Skillet, and Broiler Options
If my cast iron skillet is busy, I use a heavy oven-safe pan and lengthen preheat so the surface gets evenly hot. That simple swap keeps a strong sear and saves time when I have less gear on hand.
No-cast-iron option: choose a sturdy skillet—enameled or heavy stainless works. Heat it well over medium-high so you still get browning. If the pan is lighter, give a few extra minutes on the burner and avoid overcrowding so heat stays high.

Dry-skillet method with oil on the steak
I rub oil directly on the meat and heat a dry pan. That keeps less smoke and helps the crust form quickly.
Before the pan heads to the oven, I add a bit of butter or oil to capture pan juices and finish flavor. Season as usual with salt and rest after cooking.
Broiler strategy for thinner steaks
For thin cuts I switch to the broiler and place a rack close to the element. Expect about 6–10 minutes total, flipping halfway for even color.
I always use my thermometer because broiler output varies and a few minutes make a big difference for doneness. Finish with a quick butter baste or spoon pan juices over slices for the best flavor.
- Use a heavy oven-safe pan if cast iron isn’t available.
- Rub oil on the meat for a dry-skillet sear; add butter before finishing.
- Under the broiler, watch the minutes closely and rely on the thermometer for final temperature.
“A good preheat and a quick rest let these variations deliver steakhouse results even without my usual iron skillet.”
Serving Ideas, Rest Minutes, and Leftover Storage
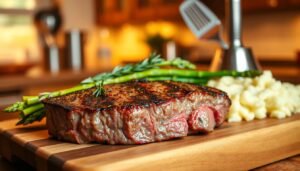
After a brief rest, I carve across the grain and dress slices with warm pan juices for immediate service.
Slice against the grain and spoon juices
I rest steaks about 5 minutes for thin cuts and up to 10 for thicker pieces. Then I slice against the grain so each bite is tender.
I spoon those savory pan juices over the slices. A quick whisk of a bit of butter makes the sauce glossy and richer. A final pinch of salt and black pepper brightens the plate.
Side ideas and reheating in the oven
- Classic sides: roasted asparagus, mashed or roasted potatoes, sautéed mushrooms, or a crisp green salad for a balanced meal.
- For leftovers, refrigerate in an airtight container for 3–5 days; keep slices a bit thick to lock moisture.
- Reheat gently: place slices in a baking dish with a splash of broth, cover with foil, and warm at 250°F for about 10 minutes so the meat stays juicy.
- A light brush of olive oil before warming helps the surface stay supple. I avoid the microwave when possible.
“A short rest and a spoon of pan juices turn a simple skillet cook into a satisfying meal.”
Conclusion
A hot pan and an accurate probe remove guesswork and deliver steady doneness on every piece.
My final take: this stove-to-oven way builds a crisp crust and a juicy center with minimal ingredients and clear time checks. I aim for 125–135°F for rare–medium-rare and allow a 5°F carryover while the meat rests.
I rest the slices 5–10 minutes, cut against the grain, and spoon pan juices over each serving. This simple recipe scales well across similar cuts and fits easy weeknight recipes or a special meal.
Use a thermometer, keep the surface dry, and rely on high heat and precise temperature. Enjoy every bite, and share how your sirloin results turned out.