

Surprising fact: nearly 60% of home cooks overcook organ meat, which drains tenderness and masks flavor.
I learned a simple trick from a grass-fed guide that changed my results. I soak slices for 30–60 minutes in milk, pat them dry, and season well. Then I sear in a very hot skillet for about 2–3 minutes per side, watching the edges turn gray while the center stays slightly pink.
This method keeps the texture silky and the taste rich, not chalky or bitter. I slice evenly, keep pieces dry before searing, and trust visual cues to know when to flip. A quick finish with caramelized onions or a splash of wine lifts the dish without making it fussy.
In short: quick prep, high heat, and careful timing are the keys that help me nail this simple, repeatable recipe any weeknight.
Key Takeaways
- Soak slices 30–60 minutes in milk to mellow edges.
- Pat dry and season confidently before searing.
- Sear 2–3 minutes per side in a hot skillet for a rosy center.
- Watch edges change color as your cue to flip.
- Finish simply—onions or a splash of wine boost flavor.
Why I Love Beef Liver When It’s Cooked Right
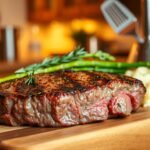
A few minutes in a screaming-hot skillet made beef liver something I actually look forward to eating. Properly seared slices—about 2–3 minutes per side—stay tender and silky. That quick sear keeps the center rosy and prevents a chalky bite.how-to-cook-ahi-tuna
I pair it with sweet onions and a handful of pan drippings. The simple combo creates a savory-sweet comfort that lifts a plain plate into a restaurant-style moment.
I also think about nutrition. This organ is dense with iron and B12, so one well-made portion feels nourishing and satisfying without fuss.
I soak slices briefly in milk, pat them dry, and season with salt, pepper, and a hint of garlic. Then I heat the skillet until it smokes lightly and sear in those critical minutes.
- Quick timing: short sear keeps tenderness.
- Simple seasoning: lets bold flavor shine.
- Pan sauce: onions and drippings finish the dish.
Choosing the Best Cut: Beef Liver vs. Calf Liver
Choosing between cuts often shapes the whole meal before the pan heats. I weigh tenderness against flavor and pick based on who I’m feeding.how-to-cook-cornish-hens
Calf liver for milder flavor and tenderness
Calf liver is my go-to when I want a softer bite and a gentler taste. It usually skips the soak, which saves valuable minutes and keeps prep simple.
Grass-fed beef liver and its nutritional edge
I reach for grass-fed beef liver when I want higher nutrient density. It often delivers more iron, vitamin A, and B12, and a cleaner flavor that stands up to bold sauces.
When I use regular beef liver, I plan a 30–120 minute milk or buttermilk soak to tame metallic notes. I also handle raw pieces gently; they tear easily, so I slice with a light touch.
- I pick calf liver for a mild, silky plate and simpler sauces.
- I choose grass-fed beef liver for richer nutrition and a more assertive taste.
- Either works if I respect quick sear minutes and careful handling.
Prep That Pays Off: Soaking, Slicing, and Patting Dry

A few careful minutes before the pan hits heat make the biggest difference in texture and taste. I build a short soak into my routine because it tames metallic notes while keeping the organ’s natural flavor.
Soak: I submerge slices in milk or buttermilk for 30–60 minutes. For larger beef pieces I may extend that up to 1–2 hours. This step calms strong edges without masking richness.how-to-cook-gnocchi
Rinse and dry
I rinse and blot each piece with paper towels so the surface sears instead of steaming. Dry, clean surfaces give quick, even browning and help keep the texture silky.
Slicing and seasoning
I slice evenly so every slice finishes at the same time. I season confidently with salt and black pepper, then add a light dusting of paprika, onion powder, and garlic powder when I plan a Southern-style dredge.
- Keep a sharp knife and steady board—clean cuts matter.
- Avoid heavy oil or butter during prep; fat belongs in the skillet.
- Good prep preserves nutrients like iron by letting you cook fast and with confidence.
Essential Tools and Fats: Large Skillet, Oil, and Butter

A hot, roomy pan is the single gear change that makes every slice brown well and stay tender. I rely on equipment and simple fats more than fancy tricks. The right pan and the right fat let me hit color fast while keeping the center soft.how-to-cook-a-london-broil
Why a large skillet and moderate heat matter:
- I use a large skillet so pieces don’t crowd. That space keeps steady heat and builds a quick, tasty crust.
- Preheat to medium or medium-high. If the pan isn’t hot, the slices steam and lose texture.
- A stainless or cast iron pan gives better browning than nonstick; those browned bits add real flavor.
Choosing fats:
- I start with a neutral oil for higher-heat frying and add a knob of butter once the pan is hot. That combo prevents scorching and boosts flavor.
- I keep olive oil on hand for gentler sautés and Italian-style finishes with herbs and wine.
- Work in batches and let the pan come back to temperature between rounds so each piece of beef liver gets the same treatment.
I watch the fat until it shimmers; that tells me the surface is ready. After searing, I scrape up fond with a splash of stock or wine and simmer with softened onions for an instant pan sauce.
If you like a cast-iron approach, try my cast-iron skillet method for a dependable finish.
How to Cook Beef Liver: My Step-by-Step Method

A clear, repeatable process makes the difference between chewy slices and a silky bite. I walk through each step so timing and heat are simple to follow.how-long-to-cook-a-15-lb-turkey
Start: I preheat a large skillet to skillet medium heat (medium or medium-high) while my seasoned liver slices rest on the board. That warm pan is the first time-saver.
Quick setup and searing
I add a thin layer of oil and work in batches so pieces sear, not steam. If I want a light crust, I lightly dredge in seasoned flour first.
I sear each slice about 2–3 minutes per side, watching the edges brown and the center keep a blush. That short minutes per side window is the critical time that keeps texture tender.
Finish and sauce
After a brief rest I sauté onions and a little garlic in the same pan. Then I deglaze with stock, water, or wine and scrape the fond to build a simple pan sauce.
| Step | Action | Time |
|---|---|---|
| Preheat | Heat large skillet to medium/medium-high | 2–4 minutes |
| Oil & batches | Add oil; cook few slices at a time | Per batch: 4–6 minutes |
| Sear | Brown both sides, keep center pink | 2–3 minutes per side |
| Rest & sauce | Rest slices; sauté onions, deglaze pan | 3–5 minutes |
I taste and adjust seasoning, then nestle the slices back in the pan just long enough to warm through. I serve immediately so the texture stays soft and the sauce shines.
For a full method and timing chart, see my full method.
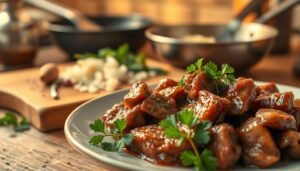
Classic Southern Comfort: Beef Liver and Onions with Gravy

A simple pan of caramelized onions and a quick gravy turns modest slices into a real Sunday supper. Comfort comes from the sweet-savory contrast and a glossy sauce that soaks into mash or crusty bread.
Prep: I season flour with kosher salt, pepper, onion powder, garlic powder, and a pinch of paprika, then dredge the slices. I fry the dredged pieces in hot oil and a touch of butter for about three minutes per side, just until browned but still tender.how-to-cook-sticky-rice
Caramelized onions, seasoned flour, and pan drippings
I move the pieces out and soften onions in the same pan drippings. When the onions are lightly caramelized, I sprinkle in a couple tablespoons of the reserved seasoned flour and stir to make a quick roux.
Whisk in water and a splash of milk; simmer until thick
Next I whisk in water and a little milk, cooking just long enough to remove the raw flour taste and let the gravy thicken. I taste and adjust with salt and pepper until it hits the balance I want.
Nestle cooked liver back in and simmer gently
I return the cooked slices to the pan and simmer very gently so the pieces stay silky, not tough. I keep the heat low and let the sauce coat each piece for a few minutes before serving.
- I serve this beef liver and onions recipe over mashed potatoes or rice for classic comfort.
- Calf liver is milder and usually skips a soak; grass-fed beef often benefits from a short milk soak.
- Leftovers keep well submerged in gravy in the fridge for 3–4 days; reheat slowly on low.
Italian Style Upgrade: Marsala, Balsamic, and Thyme

For an Italian twist, I lean on Marsala and thyme to lift the pan sauce into something bright and silky. The method is quick and keeps the centers tender while building layered flavor that feels special.
Start by lightly flouring each slice and searing it in a hot skillet. Give the floured pieces about 1–2 minutes per side over high heat so they brown fast but stay soft inside.how-to-cook-a-spiral-ham
I move the seared pieces out and soften onions and a little garlic in olive oil with a knob of butter. That aromatic base sets the stage for the sauce.
I splash Marsala into the pan, scraping up browned bits for sweetness and depth. Then I add chicken or beef stock, a touch of balsamic, and a few thyme sprigs.
Simmer gently for 3–4 minutes until the sauce is glossy. I finish with a small knob of butter and a splash of cream, then slide the slices back in to coat without overcooking.
“A butter swirl and fresh parsley make the dish look and taste like it came from a trattoria.”
- Keep the heat moderate so the sauce doesn’t break.
- Season with salt and pepper at the end and adjust acidity if needed.
- Serve with mashed potatoes or crusty bread to catch every drop.
| Step | Action | Timing |
|---|---|---|
| Sear | Floured slices in hot skillet | 1–2 minutes per side |
| Aromatics | Sauté onions and garlic in olive oil + butter | 2–3 minutes |
| Deglaze & simmer | Marsala, stock, balsamic, thyme; reduce | 3–4 minutes |
| Finish | Butter swirl, splash of cream, return slices | 1–2 minutes |
Tender Every Time: Heat, Timing, and Doneness Cues

I count minutes and read the pan so each slice finishes with a gentle blush. Short bursts of steady heat are the fastest way to a silky center and a browned edge.how-to-cook-chicken-wings-in-the-oven
Minutes per side and avoiding overcooking
I aim for about 2 minutes per side for thin cuts, and 2–3 minutes per side for thicker pieces. Keep the skillet at medium-high so the surface browns quickly without overworking the interior.
Visual cues: browned edges, slight pink center—not gray
Watch the edges turn golden and the middle stay faintly pink. When juices run clear but not bloody, it is time to pull the slices off the pan.
I let the meat rest briefly off heat so carryover finishes the job. I avoid slow methods that dry the texture and strip flavor.
| Cue | What I watch | Minutes |
|---|---|---|
| Thin slices | Quick brown edge, rosy middle | 1–2 minutes per side |
| Thicker slices | Even crust, slight blush inside | 2–3 minutes per side |
| Finish & rest | Carryover warmth, springy feel | 2–4 minutes resting |
I time the sear, protect iron and nutrients like iron by keeping the cook short, and keep aromatics—onions and garlic—cooked on their own so the beef and liver stay perfect.
What to Serve on the Side for Big Flavor

Good sides make a hearty main feel complete. I pick starches that soak up sauce and a bright vegetable that cuts the richness.how-to-clean-blackstone-after-cooking
Starches that catch every drop
Mashed potatoes and creamy polenta are my go-tos because they soak up gravy and pan sauce beautifully. I also reach for rice when I want a lighter base, or crusty bread for the Italian-style finish.
Veggies and contrast
I add a bright green side like green beans tossed with lemon and olive oil. Roasted carrots bring sweetness, and sautéed mushrooms add an earthy note that pairs well with thyme.
- I choose mashed potatoes or polenta to hold the sauce.
- Crusty bread is perfect for swiping an Italian-style pan.
- Green beans, roasted carrots, or mushrooms add balance and color.
- I season sides boldly so they stand up to the meat and onions.
For more pairing ideas, see my sides guide for beef liver onions and matching plates that boost flavor.
Storing and Reheating Without Losing Tenderness
A little care at storage time makes reheats taste nearly fresh the next day. I keep cooked liver slices submerged in gravy and sealed in an airtight container. That protective blanket locks in moisture and keeps texture soft for about 3–4 days.
Fridge, reheating, and simple tricks
I reheat low and slow on the stovetop or briefly in the microwave so the center warms without tightening. I add a splash of water or stock to loosen the sauce and avoid high heat that dries the meat.
I pat thawed pieces dry with paper towels before searing. That step keeps the pan hot and gives an even brown without overcooking.how-to-cook-beef-ribs
Freezing and portioning for future meals
I freeze raw slices flat on a sheet tray so they don’t stick, then bag and label. If I stack, I separate layers with parchment or wax paper. Thaw overnight in the fridge and soak only after thawing if needed.
- I jot notes in my recipe card or post so future me remembers exact time and temp that worked.
- Trust smell and appearance; if anything seems off, I discard.
- Chicken livers need gentler, shorter reheats—watch them closely.
Conclusion
Short prep and sharp timing are the tricks I rely on for a tender result every time. A brief soak, even slices, a thorough dry, and a preheated large skillet at skillet medium heat make the difference.
I sear slices about 2–3 minutes per side, then choose a finish: Southern gravy built with a few tablespoons of seasoned flour and pan drippings, or an Italian Marsala reduction with thyme and a butter swirl.
I use good oil and a touch of butter, season with salt, garlic, and onion, and serve with mashed potatoes or crusty bread so every drop of sauce is savored.
This simple way keeps texture silky, boosts iron-rich nutrition, and lives in my recipe card from this post for repeatable step-by-step success. For more on cooking beef liver, see this guide: cooking beef liver.